Showing posts with label the twinery. Show all posts

Saturday, April 12, 2014

"Sweet & Sassy" (Blog Hop with Perfect Paper Crafting & Simple Stories)


I'm thrilled to be taking in part in the Blog Hop with Simple Stories and Perfect Paper Crafting.  Today is the last day of the blog hop and I want to thank you for joining me on my blog.


I was thrilled to be able to be given the opportunity to play with this fabulous tool. 
I received the Perfect Layers - set of 3 different 'rulers' each with 4 different measurements. The possibilities are endless and definitely make creating mats so easy!


I decided that I would mat my photo with a few layers and then mat the papers on my layout as well.

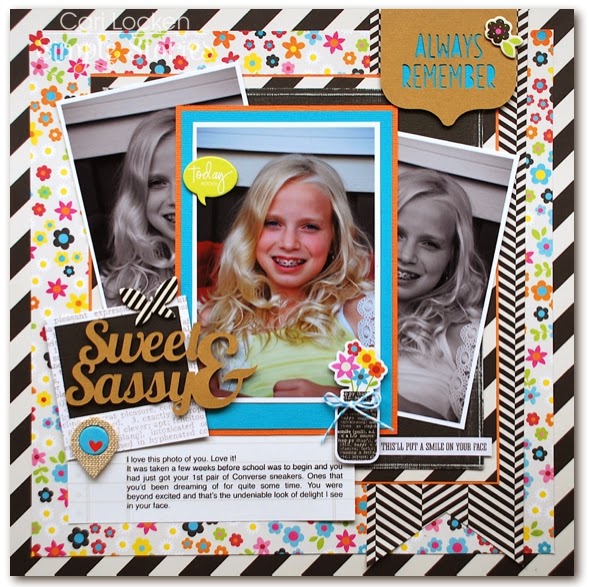
So I began layering my photo. I first printed it with a white border and then matted it onto some turquoise card stock. I adhered the photo to the card stock first and then used the 1/4" measurement to trim around the photo.


I then matted the turquoise card stock onto some orange card stock using the 1/8" measurement.


I matted a piece of black card stock onto a piece of the diagonal striped patterned paper using the 1/4" measurement. I then matted that entire piece onto some orange card stock using the 1/16" measurement.

Adding layers is a great way to add dimension to your work.  After matting your pictures you could also adhere them to your layout using foam squares for even more dimension. I decided to just adhere my main photo flat because I wanted to pop up my title instead.


Here's my finished layout.


Here's a few close-up shots.


Supplies Used:
Simple Stories (DIY Boutique collection: Patterned papers (5111, 5109, 5103); Stickers 5141,  Chipboard Stickers 5128) DIY Office Card Foundations 5123, Icon Burlap Stickers 5150
Silhouette Cameo
Simple Stories Silhouette Cut Files ("always remember" and "sweet & sassy")
Perfect Paper Crafting (Perfect Layers)
Core'dinations Colorcore Cardstock (TH Kraft Core)
The Twinery (turquoise twine)
Xyron (tape runner)
Scrapbook Adhesives by 3L (foam squares)


Thanks for stopping by ... have a fabulous weekend!!

Wednesday, November 27, 2013

Mr. Nutcracker

I'm so excited to share this new holiday creation that I made.
Isn't he just the cutest?

I'm up on the Imaginisce blog today sharing this Nutcracker that I created using THIS cut file from SVG Cuts and the new christmas collection, Colors of Christmas from Imaginisce.

He stands approx. 12" high and is about 3 1/2" wide.

I used some white Core'dinations cardstock and embossed it with a Cuttlebug folder (for the beard).
I also some large clear rhinestones (part of the Colors of Christmas collection) on his chest.


I tied some twine (The Twinery) around the top edge of his boots and some May Arts ribbon around the bottom portion of the stand.

 For the boots and hat I used Core'dinations Core Couture in white ("White Gloves").

I used the i-rock tool to adhere some white & turquoise colored Glam Rocks on his hat and some small black ones for his eyes.


I also used some Core'dinations Glitter Silk cardstock (red) for some sparkle and added texture.
It was super easy to put together and I just love how it turned out.

Supplies used: Imaginisce (Colors of Christmas: patterned papers, rhinestones, glam rocks (white, black & turquoise glimmer), i-rock tool, i-bond tool); Core'dinations Colorcore Cardstock; Silhouette Cameo; SVG cut file, Xyron (1.5" and 2" Create-a-Sticker machine; Sookwang double sided tape


Thanks for stopping by.

Wednesday, May 22, 2013

Outdoor Adventure

Imaginisce is having a release party this week for a new collection called "Outdoor Adventure".

You really should check it out because the Design Team has created some amazing projects.
I get to share some today and love this collection.

My brother & his son love to do activities together and one of them is dirt biking.


I love the die-cuts and alpha stickers.

 Even though we don't have a lot of camping photos I found another way to use it.


I cut up the strip of footprint stickers so that I could have individual prints and then used some foam tape to adhere them to the page.

I used a spellbinders die for the base of the 'happy camper' title.


Supplies: Imaginisce (Happy Camper collection: papers, die cuts, sticker stackers, alpha stickers), i-rock tool, Glam Rocks, foam tape); Core'dinations Colorcore cardstock; The Twinery (twine); Spellbinders die; marker (brown)

Thanks for stopping by.
Make sure to hop on over to the Imaginisce blog too ... there's a chance to win this collection!!!


Friday, April 26, 2013

Imaginisce & The Twinery team up!


It's been a super fun week of amazing projects from both the Imaginisce DT and The Twinery DT.  Both companies teamed up this past week for a Blog Hop and if you missed out you can go to both of the blogs and check out the amazing projects.

Each company has a great giveaway and it's open to enter until Sat., April 27th midnight!!
All you have to do is leave a comment on all the blogs that you visit throughout the week and you'll be automatically entered. There are a few extra ways to enter that are listed on the Imaginisce blog. See HERE to learn more.

So start hopping!!


Here's the Blog Hop order for today (Friday) , the last day of the Hop. :(


Imaginisce DT


The Twinery DT


Here's what I created for the hop.

I used product from the Imaginisce Childhood Memories collection. A Core'dinations tag, which I embossed, was used for my title area.

"Special Little Moments with Grand People"


Supplies used: Imaginisce (Childhood Memories collection: patterned papers, Sticker Stackers, chipboard embellishments, i-rock tool and Glam Rocks (red & white), Foam Tape & Squares, square alpha stickers); Core'dinations Colorcore Cardstock (cardstock & tags); The Twinery (colored twine); Fiskars (border punch); black pen (Uniball)


I used some twine to tie around the eyelet on the tag.

.... a close-up shot.


The main use of the twine on my layout was a diamond design.

  • I made scored lines (using my score board) on a blank sheet of paper (printer paper works just fine).
  • I then adhered that scrap paper (using temporary adhesive) to my white cardstock (everything cut to size already).
  • I used a paper piercer and poked holes at the points of interesection throughout the entire design.
  • After all of the holes had been made I began sewing the twine and creating the diamond design.
  • When the twine was finished I used my i-rock tool and adhered both small & larger red Glimmer Glam Rocks to add a bit of 'pizazz'! ;)


Thanks for stopping by today and don't forget to check out the other fabulous projects!! You will definitely find a lot of inspiration and a variety of ways to use twine & the fun Imaginisce collections!

Have a super weekend!

Thursday, October 11, 2012

Share a Card

Hi there!

Sadly ... it looks like our beautiful, sunny, warm weather may have come to a close.  The rain is scheduled to be here for the next week or so.  I must admit though we were very spoiled with such gorgeous weather this fall - and I loved every day of it!!

So tell me, ... who has been busy making their Christmas cards already??
Honestly, I haven't even thought about it yet. (just too many other things on my plate right now).

But for those of you that have thought about it and have actually started making them already then I have a great project for you!

Imaginisce is featuring Share-a-Card on their blog this week.  It's an organization that sends out cards to individuals who are seriously ill.  The cards range from birthday, any type of holiday, thinking of you, etc.  Each year they have a Holiday Card Project where they receive thousands of christmas cards that they then send out to people.
This is such an incredible idea and wonderful way to cheer up someone's life.

If you're interested in helping out this year go to their website, Share a card - Holiday Card Project. All the details are listed there.

Here's the card that I created for this project.

I used my Cricut Expression 2 and the Birthday Bash cartridge to create the cardstock base of my card.
I then cut a slightly smaller piece of patterned paper to fit on the front of the card.
I cut out the 'ribbon' strips using my Cricut again and some striped paper.  Before I adhered those striped strips I adhere some wide ribbon.
I finished off by adding some orange Rhinestone studs using my i-Rock tool.

Supplies used: Imaginisce (Christmas Cheer collection: patterned papers, die-cuts, Rhinestone studs, i-rock tool, foam tape); Cardstock, The Twinery (red twine); Cricut Expression 2, Birthday Bash cartridge

Thanks for stopping by my blog today & I hope you have a great day!

Wednesday, April 18, 2012

Cherries, Twine and Imaginisce


What do they have in common??
Well, I'm glad you asked because I will show you.

THIS!!!

Thanks for hopping over here from Helen Bird's blog. Hope you've been having fun so far today and finding new blogs that you've never been to before.

I'm so excited that Imaginisce & The Twinery teamed up this past week because I absolutely LOVE both companies!!

When I found out that we were going to be doing this blog hop I wanted to use the twine in a different way than I usually do.
So I browsed online, drew sketches and ideas down and finally came up with this idea.

I took 2 large i-top brad daddies (Imaginisce) and I covered the top of them with glue dots. (see pic).

I then placed little strips of twine across the brads. (I actually laid the twine down first and then trimmed the ends ... just to make that they were long enough).

After I had covered the entire top portion, I flipped the brad top over and put some glue dots on the inside and gently folded the ends of the twine onto the glue dots making sure that they all stuck on the inside of the brad.

I then used my i-top 2.0 tool and attached the brad daddy bottom part to the top twine-covered piece.

I created the cherry stems using some brown colored Glam Rocks and my i-rock tool. Cut out a few little leaves from patterned paper from Imaginisce's Berrylicious collection. The sentiment was printed onto the cardstock using my computer.

Supplies used: Imaginisce (Berrylicious collection; i-rock, Brown Glam Rocks, i-top 2.0, large brad daddies, Foam Squares); The Twinery (Maraschino); Core'dinations Colorcore Cardstock, Cuttlebug Embossing folder, Colorbox Fluid Chalk ink

Thanks for stopping by my blog today!
Don't forget to leave comments on all the blogs participating in this blog hop.
You'll be entered to win some fabulous prizes (check Imaginisce and The Twinery blogs for more details)

The Twinery's Giveaway

Imaginisce's Giveaway

And now I'm going to send you on your way to continue this BLOG HOP to ...

Monday, April 16, 2012

Fun event happening this week!


This week Imaginisce and The Twinery have teamed up and we've got a fabulous blog hop happening everyday this week. You won't want to miss it.

They'll be lots of great prizes to be won so make sure to check it out!!

Friday, August 19, 2011

I love my twine!!!!

I have to say that I just love The Twinery - the colors of twine that they have are so much fun and I just love using it on my cards and layouts.

If you love it as much as I do then you won't want to miss out on this!! They are giving away an ULTIMATE BUNDLE of twine - an awesome prize!! And they're giving away 2 full sets!!!! I totally would love to win this!!!! Look at all those amazing colors?!
So, if you're interested too then start spreading the news!! You only have until MIDNIGHT TONIGHT!!! So hurry!!!

And because I love it so much I just thought I'd share some things that I have made in the past using the twine.

Here are some layouts:


And some cards:


Have a great weekend!!