Showing posts with label Core'dinations. Show all posts

Thursday, May 29, 2014

Instagram Mini Style

Hi there everyone!

I'm so excited to be sharing another project on the Silhouette blog today - in the Scrapbooking/Cards section.
It's a mini album - filled with some favourite photos from the month of May.
This cut file is so easy to use and so much fun to create with.

instagram mini |Cari Locken for Silhouette


I simply cut out the box design and the pages (using the size that it opens up in the Silhouette program).  I did cut out the pages 2 times because I wanted my album to have more pages.  If you do this you will have to keep in mind that you don't use a lot of foam squares on the inside pages because this will add bulk to your album. 


camerabox | Cari Locken for Silhouette


I did add some other elements to the front of the camera box such as the round 'instagram' design.  I cut several layers of the circle in 2 colours of card stock and adhere them together using foam squares to give some added depth to the lense on the outside of the box.

cameraboxclose | Cari Locken for Silhouette

I used a lot of different cut files on the inside of the mini book as well.  Sometimes I kept the negative pieces and used those for embellishments as well.
I've listed the cut files on the Silhouette blog so hop on over there to check it out. Be prepared ... there's quite a few!

And now ... Here's a look at the cover of the mini.

covermini | Cari Locken for Silhouette

And here's a peek at the inside pages.

Pages 1 -4
All of the photos I printed at 2" x 2" in size and trimmed them to have a thin white border around them. 

insidepages1-4.002 | Cari Locken for Silhouette


A close up shot .... Instead of using my computer to journal (like I always do) I decided to use my own handwriting to add a more personal touch to this album. This is the intro page - sharing some favourite instagram pictures from the month of May.
I also cut out an extra 'instagram circle' shape and then cut out the words 'instagram' from the design to use here on this opening page as part of the journaling.

insideclose1 | Cari Locken for Silhouette


Pages 5-8
album pages5-8.002 | Cari Locken for SIlhouette


Some more closeups ...
insidepagesclose5 | Cari Locken for SIlhouette

insideclose8


Pages 9 - 12
album pages9-12.002|Cari Locken for Silhouette


Pages 13 - 16
album pages13-16.002 | Cari Locken for Silhouette


Pages 17 - 20
album pages17-20.002 | Cari Locken for Silhouette


A close-up.
insideclose18 | Cari Locken For Silhouette


Last page of the mini album.
inside21&22 | Cari LOcken for Silhouette


And the back cover I just continued on with the 'instagram' theme from the front of the camera box.
backcover | Cari Locken for Silhouette

minialbumset | Cari Locken for Silhouette


Thanks for stopping by.
I hope that I've inspired you to check out more of the amazing cut files at the Silhouette Online Store.

Wednesday, May 28, 2014

Summertime!

I'm back with a couple more projects to share with you.
Both can be found in the Canadian Scrapbooker Summer issue - that's just hitting the stands now!!


This first project is another layout that I created using Simple Stories "Summer Paradise".  It's a small collection but just perfect for all your summertime photos!

These photos are from a few years back but the colours worked together wonderfully.


I love how all of the embellishments (stickers, die cuts) all work together and match! Love thaT!


And here's a Father's Day card - now I'll be ready on time this year!!

I used some Core'dinations Cardstock and embossed with a 'metal' design embossing folder.
I then added some Simple Stories ("Hey Pop" collection: patterned paper, cards and stickers).  Once again everything works together so nicely PLUS I just love the designs.


Monday, May 26, 2014

Canadian Scrapbooker Summer issue is here!!

Yeah!! It's out and fabulous!! The summer issue of the Canadian Scrapbooker magazine is out!!!

And I'm so excited to finally share my layouts with you.  Today I'm only going to share one because this was my favourite! But join me again tomorrow and Wednesday as I share some more of my creations.

The layout below I created using my Silhouette Cameo (for the cut feather and the title) I just love how the feather turned out!!

I used Simple Stories A Charmed Life collection.


Here's a close-up of the feathers.


The title I cut from some Core'dinations Colorcore card stock and then added a sticker using foam squares for some added dimension.

I used a pocket from the same Simple Stories collection to add some journaling.


Supplies used: Silhouette Cameo, Feathers cut file; Simple Stories (A Charmed Life: patterned papers, stickers, 4x6 Sn@p Cards,  Sn@p Pockets), Clear Photo Stickers and Enamel Dots; Core'dinations colorcore cardstock


Thanks for stopping by.
I hope you'll pop by again tomorrow.

Thursday, May 22, 2014

Paper Crafter's Library Feature

Thanks for popping by my blog today.

I'm thrilled to be featured on the Paper Crafter''s Library blog today.

Here's a peek of my work.
I created 2 projects for my spotlight.  Hope you like 'em!

Here's the first one:

and here's the second one.


But you'll have to hop on over to their blog to check out both projects in full.

Tuesday, May 13, 2014

Scrapbook Generations CREATE

Woohoo!! We can finally share!

Simple Stories is the featured manufacturer this month in the Scrapbook Generations magazine called CREATE.  It's a fabulous issue with so many projects, ideas and inspiration - 245 pages!   You won't want to miss it!!

Click here to read/download this month's issue.


These are the 2 layouts that I created from sketches given to us.

This first layout was based on a single page sketch. I loved the sketch and basically kept everything the same.


And here's a few close-up shots.


 I love the DIY kraft pocket to add some hidden journaling on the DIY Office tags.

I used some clear white stickers on the photos as well.


The sketch design had a row of pennants so I used a variety of stickers from the DIY collection.

Supplies used:
Simple Stories (Hey Mom (papers, stickers); DIY collection (stickers, envelope); Core'dinations (card stock); Fiskars (borthder punch); Petaloo (Flowers)


The second layout was a 2 page sketch - I haven't done these in a long time so it was a great challenge for me! (because I'm not used to using that many photos at once!)


I used my Silhouette to cut the word 'awesome' for my title.


Here's a few more close-up shots.


Supplies used: 
Simple Stories (Summer Paradise (patterned papers, cards, stickers); Fiskars (border punch); Silhouette Cameo; Core'dinations (card stock)


Thanks for stopping by!
And make sure to check out the May issue of Create - you won't be disappointed because there is so much inspiration!!!

Monday, April 14, 2014

Spread Your Wings & Fly!

Today I'm super excited to be Guest Designing for Top Dog Dies.


Top Dog Dies is a new online store that offers their own brand of wafer-thin and steel-rule dies, along with dies from brands you already know and trust, including My Favorite Things, Lawn Fawn, Taylored Expressions. Savvy Stamps and Cheery Lynn Designs. Top Dog Dies is also the leading U.S. retailer for Tattered Lace, a new line of intricate dies designed by British designer Stephanie Weightman.

Top Dog Dies is also doing a GIVEAWAY for the whole month of April. Everyone who comments on my blog will be entered for a chance to win! The winner will receive $50 worth of exclusive dies from Top Dog Dies (their choice!). 

All you need to register via the Rafflecopter app on the page to enter. Deadline to enter will be Wednesday, April 30 at midnight Central Standard Time.


*********

Ok, onto my project!
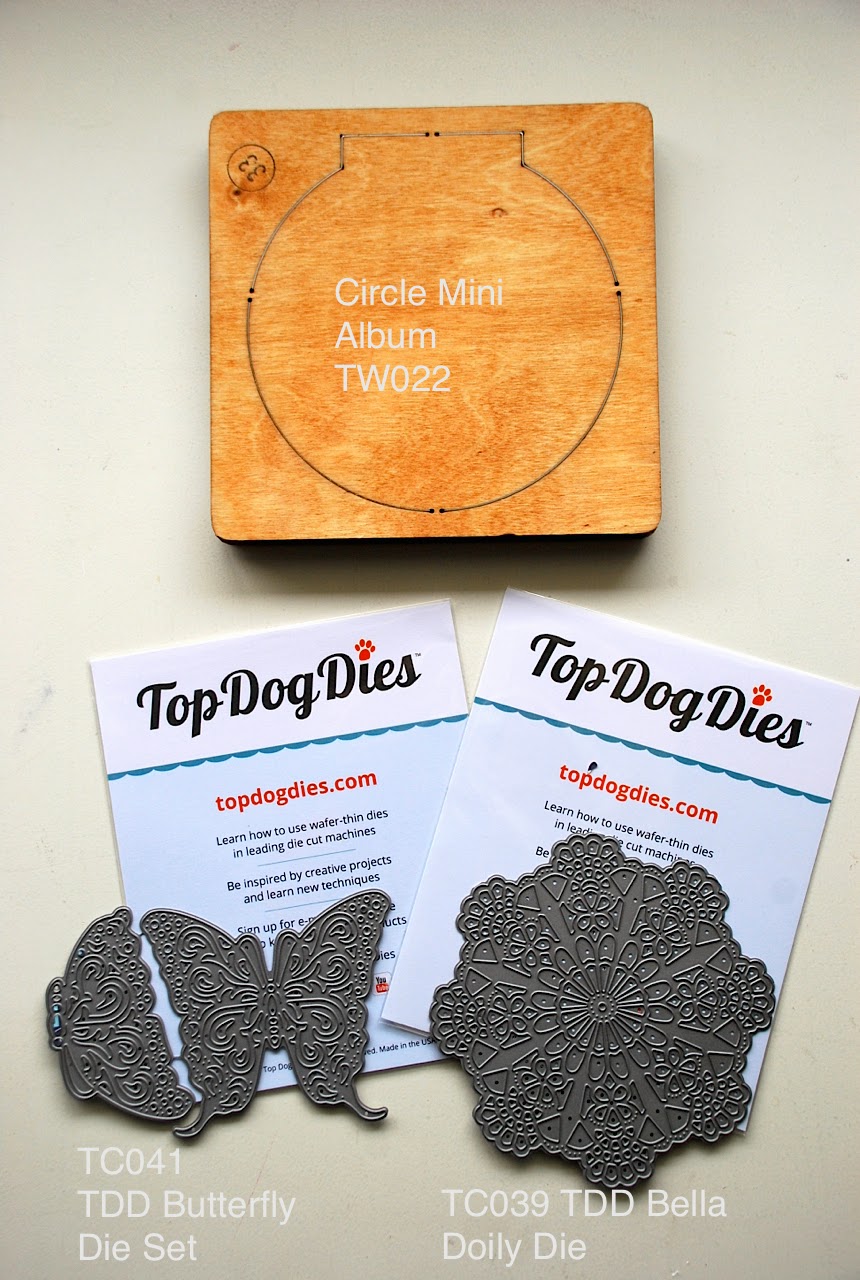
Top Dog Dies sent me 3 different dies. (shown in picture below).
Steel-Rule Die (Circle Mini Album) and 2 Wafter Thin dies (butterfly and Bella Doily Die)


At first glance I was all set to create a mini album because, after all, that's what the die was intended for.  But I decided that was too simple and expected to I decided to use it on a layout instead.

So here's what I created.


I cut out 3 of the doily shapes from white card stock and layered them on the background papers.

I cut out the butterfly shapes from some Imaginisce patterned paper (Welcome Spring) .  I added some rhinestones to the centre of the butterfly bodies.

I cut out 2 of the circle mini album shapes from patterned paper and used them to create a 'flap' to reveal another photo below.  (you could easily add more photos & journaling here). (on the Top Dog Dies I'll share I attached the layers together).

If you hop on over to the Top Dog Dies blog I have a tutorial of this project posted there.

Supplies used:
Top Dog Dies (Wafter Thin Dies: Butterfly & Bella Doily; Steel-ruled dies: circle mini album)
Imaginisce: Welcome Spring collection (patterned papers, die cut tags, rhinestones)
Core'dinations Colorcore Cardstock (white)
American Crafts (White Thickers, Slick Writer marker in black)
Maya Road (twine)
Xyron (Megan Tape Runner)
Scrapbook Adhesives by 3L (foam squares)


Thanks for stopping by today.
Don't forget to leave a comment her on my blog for a chance to win $50 worth of TDD exclusive dies!

Saturday, April 12, 2014

"Sweet & Sassy" (Blog Hop with Perfect Paper Crafting & Simple Stories)


I'm thrilled to be taking in part in the Blog Hop with Simple Stories and Perfect Paper Crafting.  Today is the last day of the blog hop and I want to thank you for joining me on my blog.


I was thrilled to be able to be given the opportunity to play with this fabulous tool. 
I received the Perfect Layers - set of 3 different 'rulers' each with 4 different measurements. The possibilities are endless and definitely make creating mats so easy!


I decided that I would mat my photo with a few layers and then mat the papers on my layout as well.

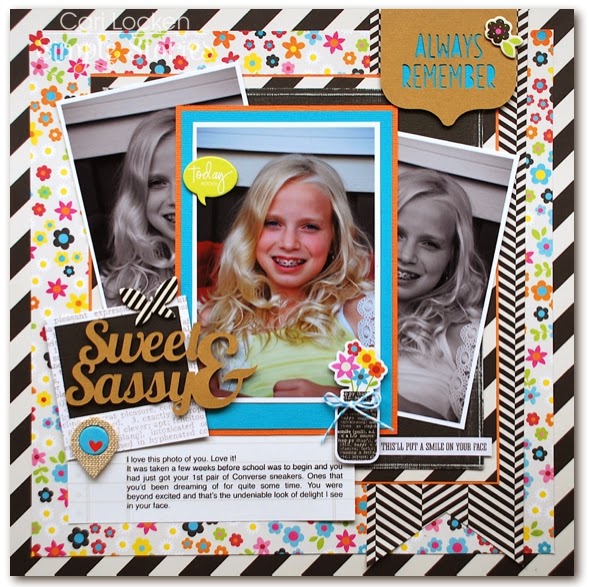
So I began layering my photo. I first printed it with a white border and then matted it onto some turquoise card stock. I adhered the photo to the card stock first and then used the 1/4" measurement to trim around the photo.


I then matted the turquoise card stock onto some orange card stock using the 1/8" measurement.


I matted a piece of black card stock onto a piece of the diagonal striped patterned paper using the 1/4" measurement. I then matted that entire piece onto some orange card stock using the 1/16" measurement.

Adding layers is a great way to add dimension to your work.  After matting your pictures you could also adhere them to your layout using foam squares for even more dimension. I decided to just adhere my main photo flat because I wanted to pop up my title instead.


Here's my finished layout.


Here's a few close-up shots.


Supplies Used:
Simple Stories (DIY Boutique collection: Patterned papers (5111, 5109, 5103); Stickers 5141,  Chipboard Stickers 5128) DIY Office Card Foundations 5123, Icon Burlap Stickers 5150
Silhouette Cameo
Simple Stories Silhouette Cut Files ("always remember" and "sweet & sassy")
Perfect Paper Crafting (Perfect Layers)
Core'dinations Colorcore Cardstock (TH Kraft Core)
The Twinery (turquoise twine)
Xyron (tape runner)
Scrapbook Adhesives by 3L (foam squares)


Thanks for stopping by ... have a fabulous weekend!!